How to Make an Outdoor Stove in Just a Few Minutes

What you will find in this post:

· How to quickly make and use a simple stove for outdoor cooking

Out of respect for your time and energy, my posts are written in “backwards” order, to help you gather the information provided as quickly as possible.


Conclusion:

The Rocket Stove is an ingenious, yet simple stove that anyone can make in just minutes. It will enable you to cook food, boil water, etc. using small pieces of fuel that are easily obtainable

image

almost anywhere. There is no need to cut down trees or split firewood. The Rocket Stove is probably safer than making a camp fire inside a ring of rocks.

The Principle:

The principle at play with the Rocket Stove is simply the principle that causes any wood stove to operate effectively. That principle is the combining of combustible fuel, air and heat.

The Rocket Stove is simply a chimney, with a combustion chamber at the bottom end. The rising of the chimney causes it to draw air through the entrance to the combustion chamber, burning the fuel. The higher the chimney, the better the draw, the better the draw, the faster and hotter the fire burns, up to its “Tipping Point” where the chimney top gets too high above the fire for the fire to effectively heat the pot or pan on top.

It does a wonderful job of bringing air into the combustion chamber, creating a hot, clean burning fire that will cook food quickly. Once your fire is going, the combustion is so complete that there is very little to no smoke.

Details:

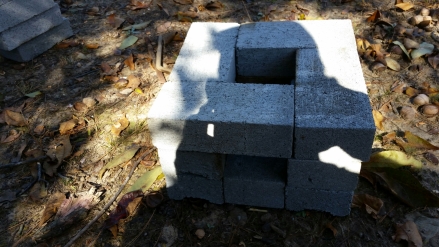
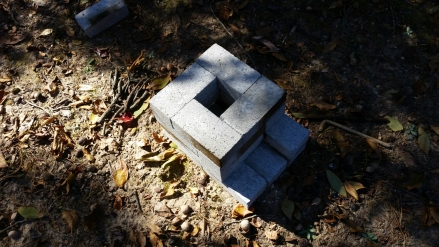
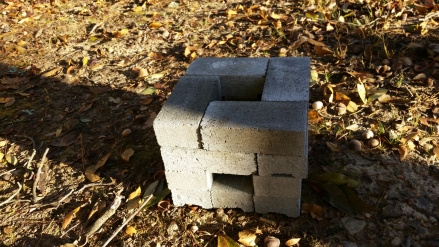
The Rocket Stove illustrated is made from 18 bricks. The same design can be made using rocks found in the wild, larger ones can be made using full size cinder blocks. The possibilities are only limited by adhering to the principles of combustion, the chimney and your imagination.

There is a 55 second video on YouTube that shows the construction of a 16 brick Rocket Stove that necessitates the cutting of a brick in half. I don’t like cutting bricks, so I added two extra bricks that enabled me to build this stove faster than I could have cut a brick in half. That video shows how to build one quickly and easily.

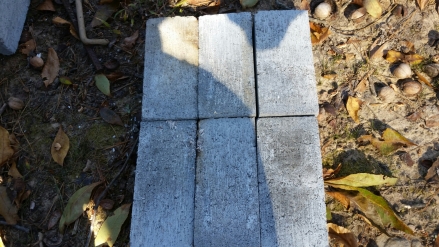
The solid layer of bricks on the bottom is not necessary, if you don’t mind burning the ground underneath your stove. My use of six bricks to form a solid foundation enabled me to just leave the unused half of two bricks sticking out on the rear.

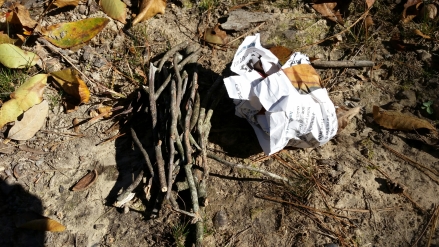
This ingenious little stove will produce almost instant heat, using only small twigs, or fairly thin scraps of lumber for fuel. As the fuel burns down, just push more in through the opening in front to keep the fire going as long as you want.

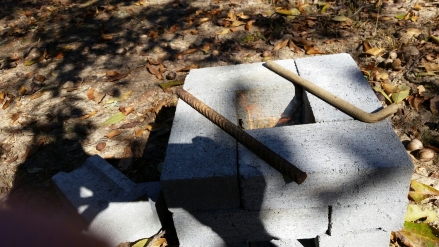
In addition to the bricks or rocks to build the stove, you will need a couple of thin sticks or pieces of metal to place on the top, adjacent to the chimney opening that will hold your pot slightly above the chimney, so that your pot doesn’t stop the flow of air through the chimney, which would smother your fire.

The pictures below illustrate the building process.

image

The foundation; Layer 1

image

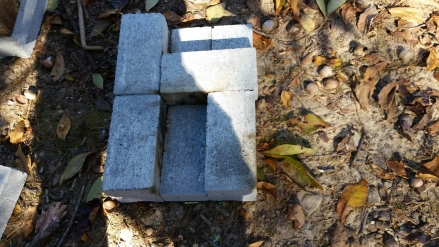
The second layer of bricks

image

The third layer

image

The fourth layer; view of top and rear of stove

image

The fire burning & supports for a pot on top

image

The fuel and tinder used for the fire in the photo above

To be sure and get more valuable, unbiased information on survival and productivity topics, just click below to follow this blog, to be notified of new posts.

Your “likes,” “follows,” “tweets/re-tweets” and “mentions” on social media are very much appreciated.


I hope this has made your day better, Ozark Mountain Bob

How to Quickly Have a Garden Anywhere

What you will find in this post:

· An alternative quick, easy way to create a garden in any location

· How to create a cheap “Greenhouse”

· Link to my original source for this information

· Seed planting tip

· Planting suggestion for a quick, quality crop

Note: This is another of my “backward” articles, written to enable each reader to get the information needed as fast as possible. This also lets you evaluate the article faster, to determine if it fits your interests. Your time is valuable. Feedback is welcome.

Conclusion:

By using bales of straw (not hay), with the cut side up and conditioning them with fertilizer, either organic or chemical, and adding a little sterile potting mix on top, you can create any size garden anywhere. The major concern for this garden is that, after it is soaked with water, the water will run out the bottom, so it’s not recommended for indoor use, but will work well on a balcony or roof-top, in your driveway, on the patio or anywhere else you may need to locate it. If you were to do this indoors, you would also need to provide artificial light.

Principle:

The principle at work is decomposition. Microbial activity causes the straw to break down (composting) and that process creates and releases nutrients that feed the plants, while creating enough heat to keep the roots warm enough for excellent growth, while the tops of the plants are exposed to the ambient outside temperature, sunlight and air. This is a great combination.

The Details:

One day, I tuned in to the Joyce Riley radio show and just happened to catch her interview with Joel Karsten, who is a horticulturist, who did all the necessary experimentation to learn and perfect this alternative method of gardening. The interview was very interesting, so I went to Joel’s website at http://www.strawbalegardens.com and ordered his book.

Although the method is simple, easy and inexpensive, I being one who likes to jump right in, I tried to start my own straw bale garden, and it failed because I didn’t know and follow all the steps of the process. I was “redeemed” from this practice when the book arrived. You need the book for encouragement, neat ideas, beautiful illustrative pictures and step-by-step instructions. You may be able to find the book in your public library. I have no financial agreement/arrangement with Joel Karsten. As always, I recommend other people’s products based solely on my experience with those products, and my belief in their value to this community.

My purpose here is to alert you to the fact that this method of gardening is workable, and I do recommend Mr. Karsten’s book, because his system works. It is versatile and the limits of this system are few and unimportant.

The process that I followed from the book that produced a successful garden that all my neighbors marveled at was to condition the bales according to the day-by-day, step-by-step instructions from the book for 12 days. This is the process to get the microbial decomposing action going inside the bales, which is what feeds the vegetables you grow. After conditioning the bales, you will pack a little potting mix on the topside of each bale and plant your seeds. Conditioning only takes a few minutes per bale, per day. After the planting is done, all that’s left to do is water a few times per week.

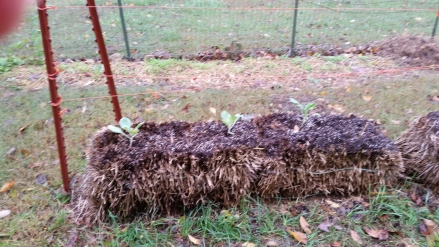
For my spring/summer garden of 2014 I raised a fine crop of Arkansas Traveler Tomatoes, Purple Hull Peas, Blue Lake Bush beans, Cucumbers and Bell Peppers. I have just started my fall garden, because the weather has been so unusual for the last 3 years, with some cabbage plants. Decomposing straw bales from summer garden, now planted for fall. See the photo below.

image

According to Mr. Karsten, the bales should last through about 3 gardens; summer garden, fall garden and the next year’s summer garden. After that, it will be necessary to start with fresh bales again.

You can also extend the growing season in the bales by driving one post into the ground at each end of the bale, or line of bales, then tie a wire or small rope between the posts and hang plastic sheeting over the wire, forming a tent-like “structure” that extends to the ground and secure the bottom of the plastic under the edge of the bales, or if you need more width, pull the plastic further from the bales and secure with rocks, bricks, boards, or whatever you have available.

At http://www.strawbalegardens.com Mr. Karsten has a short video that gives an accurate overview and explanation of how the system works.

As I have transitioned from store-bought hybrid seeds, which are GMO, unless otherwise stated, to heirloom seeds. I have enjoyed the fact that I get tastier veggies and that I can collect seed from the fruit for next year’s use, without any loss of potency or quality. For seed collecting methods and details, I defer to Jackie Clay at http://www.backwoodshome.com She is a real expert on that subject and much more proficient at it than I am.

One problem that I had with heirloom seeds is lower germination rates than with hybrid. Realize that the idea of hybrids is to overcome the disadvantages of heirloom seeds, which they do, but the quality of fruit suffers also.

To overcome that problem, my wife had a brilliant idea: Sprout the seeds before planting! It works; it is foolproof. She just folds a paper towel in half, dampens it with water and then places the seeds between the two layers of paper towel on a plate and places the plate in a window for light. Within a few days, depending on the type of seed, some sprout, some do not. We then just plant the ones that sprouted. We know we planted viable seeds and can also space them appropriately for the size of the forthcoming plants, eliminating the need for thinning after they come up.

You may remember a previous post that I wrote about gardening in the ground, using mulch. I still do that, too. This year the straw bale gardening was an experiment, and one that worked so well that we will continue it as part of our gardening procedure.

One thing that I like about the bales is that you can have a viable garden almost instantly, without suffering through several years of weak production, as you wait for the soil to be strengthened. That means that I could re-locate without having to worry about building up the soil at the new location before I could have a good garden. In similar manner, anyone, with any amount of space, can have a good garden right away, without concern for the surface underneath the bales.

At the moment, I am building a small greenhouse because the weather has been so unusual over the last three years, so I can have more control over the climate my veggies live in. For this winter, I will include 4 straw bales inside the greenhouse, along with potted veggies and a compost bin, which will produce a small amount of heat.

Planting suggestion: Kale is a very hearty green leafy vegetable that will survive cold, including snow. It is one of the most nutritious veggies you can grow, and, like the energizer bunny, it “keeps on going…and going.” It is easy to grow and harvest. To harvest, just cut about half of the leaves from a given plant, and in a short time, the remaining plant will grow more leaves to replace the ones you harvested. This equates to a regular supply of a vegetable from a really small garden.

Have you had experience with an alternative gardening system that would help readers learn to plant a survival garden quickly? If so, please share your wit and wisdom with the rest of us…let the conversation begin!


I hope this has made your day better, Ozark Mountain Bob

How to Make a Fire That Burns Effectively

Today I am going to reveal the principles that make it possible to build a fire that’s guaranteed to burn effectively, without dangerous accelerants. By “effective” I mean one that can be used for warmth, purifying water and cooking.

“Fire is a good servant but a terrible master” – Old Proverb

Fire requires dry fuel, heat and oxygen (air) in order to burn. If any of these elements is missing, there will be no fire.

For that reason, I suggest that you keep some tinder (a material that burns easily at a low temperature such as newspaper or dry leaves) and some kindling wood, which is just small twigs or thin lumber scraps in your Get Home Bag, and Bug Out Bag, as well as keeping some stored in the garage. By preparing this ahead of the need, you can ensure that it stays dry. If you need a fire after a wet disaster, you will need some dry material to start a fire. Once started well, that fire can dry wet or damp wood and raise its temperature sufficiently to burn it.

Fuel burns when its temperature reaches its point of combustion, so it’s heat, not flame that makes fire.

The principle that gets a fire going is that sufficient heat and air ignite the tinder, then before the tinder burns up, it starts the smallest kindling, which in turn ignites larger kindling, which ignites heavier fuel and so on until you have several pieces of your largest desired fuel burning. This means that you need to allow for plenty of air circulation to get and keep a fire going.

Here are the steps you need to take. Don’t try to skip any, or your fire will fail.

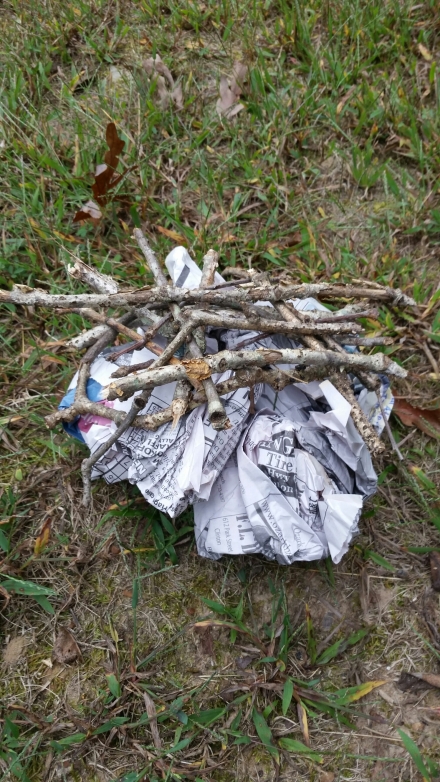
1. Wad up several sheets of newspaper firmly, but not tightly and lay them side-by-side so they are all touching and form a square or triangle, to form a base.

Figure 1
image

Stage One of Fire Building

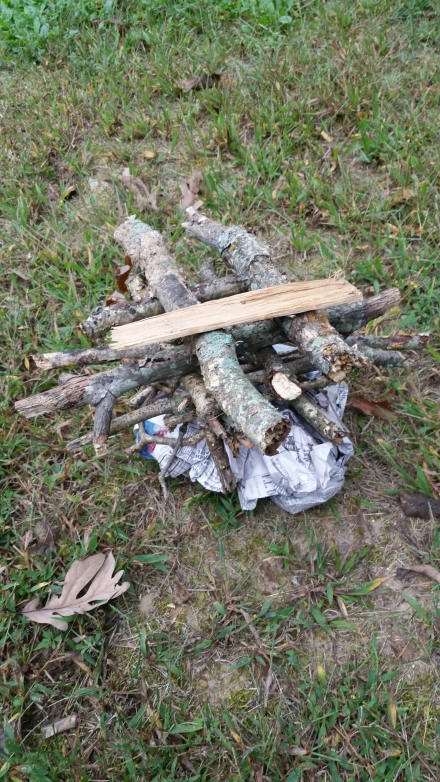
Figure 2
image

Stage 2 with larger wood added

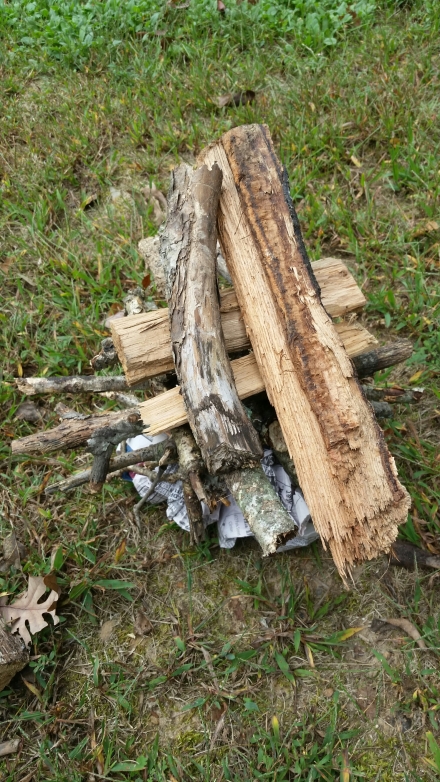
Figure 3
image

This fire is ready to light

2. Lay your smallest kindling on top, as if you were building a log cabin. In other words lay two sticks on top of the paper parallel to each other with a few inches of space between them, then lay two more perpendicular to the first two sticks, on top of the first sticks. Just keep alternating the stacking of the twigs until you have 5 or 6 layers, then increase the size of the kindling sticks for another layer or two, then increase the size of the sticks again. Be careful to leave plenty of visible air space all around. Build this “structure” as tall as possible, with ever increasing thickness of wood.

3. Be sure to have some more dry kindling in reserve and light the fire. Once you see that all the kindling is burning, you can slowly add more and larger wood. You can continuously add more wood, while leaving plenty of room for air circulation around each piece of wood. When the fire is burning faster than you want it to, use a long stick to move the pieces of fuel closer together, reducing their oxygen and you will slow down the burn rate. When you need to speed it up for cooking, just open up the space between pieces of fuel for a hotter fire.

Some principles to remember that will enhance your fire making ability are:

1. Don’t try to hurry the process

2. Don’t reduce air flow by using too much fuel, or by placing fuel too close together

3. If you dig a hole to build your fire in, air flow will be reduced and your fire may not be successful. It is better to build a circle of rocks on the ground, with small cracks for air flow between the rocks.

4. Using gasoline to start a fire is dangerous and, if your fuel is damp or wet, the gasoline will burn so fast that it doesn’t heat the wood sufficiently to ignite it

5. Do not try to keep tinder, kindling or matches dry in a cellophane bag. Condensation will dampen it

6. Butane/propane lighters may not work at all in cold weather. Keep some dry matches available at all times.

7. The size and moisture content of your intended fuel will determine how long your kindling must burn in order to ignite it. Plan accordingly when packing your dry kindling

8. When selecting kindling, go for thin, then increase thickness of fuel as the fire progresses

9. Too much fuel, compared to the rate of combustion can smother a fire. Always think and add fuel carefully

10. If using dry leaves for tinder, keep them very loose, or they may just smolder

11. Air flow is the key to rate of combustion, so you want lots of airspace in the beginning stages of the fire, which will yield a more sure result

12. Once the fire is burning, keep the hot parts of the fuel very close, or even touching each other to maximize reciprocal heat transfer between the fuel pieces.

13. Always have plan and method at hand to put the fire out, should you begin to lose control of it


Answering Your Questions

A frequently asked question that I’ll address today is: “If I store food and water in my car in the summertime, won’t it spoil?”

Answer: If the food is properly preserved, no. Properly preserved means commercially canned or dried foods, or foods that you have sufficiently dehydrated at home. Water, however should be kept cool, and keeping preserved food cool will certainly not hurt it.

That brings up a compound question about management/labor intensity and the possibility of keeping something cool in a hot car.

Everyone knows that things can be kept cool with the use of a cooler with re-freezable ice packs, but this is labor intensive, as it will need your attention on a daily basis. The idea is to “set it and forget it” for the entire season, or until you need to use the contents of your Get Home Bag.

Obviously, not everyone has read the posts in which I have touted the benefits of aluminum foil. Tin foil is worth its weight in gold, when it comes to protecting things from heat. There are two ways you can use it to keep stuff cool.

1. Wrap each item that you want to keep cool in tin foil, then pack the item into your Get Home Bag. This is cumbersome, uses up space quickly and is more time consuming than necessary.

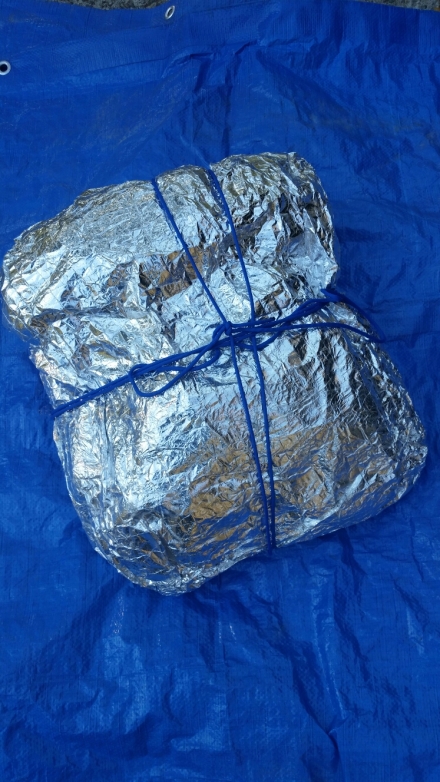
2. Pack your supplies into the Get Home Bag, then wrap the entire bag in foil, with the shiny side out. If you cut an extra large piece, or lay two pieces together to get the necessary width, you can just wrap the bag as if it were a sandwich and fold over the ends. You can also tie it onto the bag with your 550 paracord or rope.

Tin foil is better than any amount of insulation for keeping heat out because it reflects about 95% of heat…it will not transfer the heat, whereas insulation only DELAYS the transfer of heat, which means that, over time, insulation will no longer keep your supplies cool. Additionally, the foil doesn’t increase and decrease in temperature, so there is no condensation to worry about.
image
Figure 1My bag which is a backpack loaded with get home supplies, wrapped in foil

You can test this, as I did, by wrapping some bottles of water in tinfoil, then place them in your car on a hot day. After it has been there for a good while, unwrap the water and note the coolness of the bottles.  You can further help this process by keeping your supplies out of the direct sun in the car. I keep my Get Home Bag on the floor of my vehicles, behind the driver’s seat.

As summer fades and fall begins, now is a good time to inventory your Get Home Bag, or create one; pack or re-pack for the cooler weather as necessary, wrap it in foil and forget it until winter approaches. You should update your Get Home Bag four times per year, as the seasons change so that your supplies will meet your needs effectively.


Have You Heard About Bentonite Clay?

Bentonite Clay is an obscure product of volcanic ash that has been used to enhance physical health in a variety of ways down through the centuries of human history. Its benefits are absolutely amazing. I would say that, without question, it belongs in every survival pack and in everyone’s medicine cabinet because it is so versatile, simple and helpful.

Bentonite Clay is, as far as I know, the only substance of its kind that has unique properties that enable it to bring comfort to folks suffering from a wide range of maladies.

This clay is a very fine powder that, when mixed with water, can be used internally and externally to heal insect bites, stings, remove toxins, heavy metals and chemicals from the body. It is used as bath salts by some folks, as well as a major component of skin care “recipes”.

Last summer I walked across my yard, and, as I turned the corner around the end of my house, I met a fast flying, tactically astute wasp. He or she very quickly stung me on my bare arm…ouch! I turned around, went inside and got about 1/3 teaspoon of Bentonite Clay, added a couple of drops of water to the spoon and mixed it into a paste with my finger and applied it to the sting site. I then used a Band-Aid to hold that poultice in place. For a very few minutes, it hurt again, as the clay was pulling the venom out of my arm. Within ten minutes, I felt no effects of the sting!

Bentonite Clay has the extraordinary quality of carrying a strong negative charge, just like in electricity. That negative charge attracts toxins, which carry a positive charge, like a magnet. This removes toxins from the body. The clay also helps to deliver oxygen to the site of application, while removing excess hydrogen, according to http://www.wellnessmama.com This allows increased oxygen to work its “magic” on the wound.

This phenomenal clay can be used in the same way on insect bites over large or small areas of the body, it is effective on cuts and scrapes as well.

The principle I have observed during several years of using this little known substance is that toxins irritate the body, the clay removes the toxins (cleansing), and healing is promoted.

Recently, I also learned from http://www.wellnessmama.com that Bentonite Clay also delivers valuable minerals to the wound, which further accelerates healing.

I have a friend who also uses Bentonite Clay to relieve aches and pains in joints by applying the clay as described above to the site of the pain. I haven’t tried that; I don’t know why, but I haven’t. Maybe now that I have remembered, I will.

In just the same way as this clay works to remove the toxins from external wounds, it can be used to remove toxins internally, by simply stirring about one third to one half teaspoon of clay into about 6 or 8 ounces of water and drinking it. It doesn’t taste really good, but it’s not really bad, either. Some folks just drink the whole glass of the mixture at one time, others will sip it occasionally throughout the day. Just do whatever works best for you. If, however, you are taking medications, you should talk to your doctor and pharmacist to see if the clay will remove the medications from your body. That would not be a good thing.

There is a 90 year old lady in our area who is part American Indian, who has been using alternative/herbal healing methods for a wide range of sickness and disease for a long time. Here’s how she uses her Bentonite Clay: She mixes the clay into the water at bedtime, covers it and lets it sit overnight, then, first thing in the morning she drinks the water and leaves the clay sediment in the bottom of the glass. She says that all the needed qualities of the clay are suspended in the water. That’s another method of taking it internally, that you may want to try, if it won’t interfere with your medications.

Bentonite Clay is so simple, and so inexpensive that it is so easy to overlook. If you do an internet search on it, you will find information on people who have used it to heal just about everything, from cuts to cancer.

If I ever have the unfortunate experience of being snake-bit, I plan to use Bentonite Clay as quickly as possible to draw the venom out before it has time to circulate in my system. Hopefully, that situation won’t occur.

You can find Bentonite Clay for sale on the internet, nicely packaged in colorful jars for under $10. I buy mine in bulk from Ameriherb http://www.ameriherb.com in Ames, IA, where it is just under $5 per pound. A pound goes a long way and it’s easy to store in the heavy bag that it’s packaged in.

This post is just an introduction to this amazing substance. There is a much more detailed article on Bentonite Clay at http://www.wellnessmama.com 

What are your experiences with Bentonite Clay? Can you offer some helpful guidance to others who don’t know much about it? Please join in and give all the help you can. Thanks.


Single Shot Free Special


As smart as you are, you already know that the wise person prepares ahead of time for unforseen future events. You know the importance of alwarys having food and water with you, because you never know when or where you might be delayed and need it to keep your energy up and keep you from getting growly. I know that if I get hungry and my belly button starts to rub against my backbone, I get growly. I’ll bet you do too!

Today seems like a good time for me to share one of my regular recipes with you, to help you make your own nutritious snacks to carry with you everyday.

I’m talking about beef jerky, but your choice could be venison jerky or dried fish.

Here’s the simple recipe: Take a sizeable cut of meat such as shoulder roast, or eye of round roast which are not expensive, but are rather tough. Stay with me, now. When made into jerky they are not all that tough, but are a bit chewy, which is good because we like to chew, especially when it tastes this good.

Sharpen your long knife and slice the raw roast across the grain into thin slices according to your liking. You can make it almost paper thin, or a good bit thicker. As you slice, remove any excess fat to avoid premature spoiling. Season the slices with your favorite seasonings. I use salt, black pepper and garlic powder. If the slices are fairly thick, season both sides. If quite thin, you only need to season one side. After seasoning, stack the pieces in a bowl and cover with plastic wrap and let it all sit in the fridge overnight.

The next morning, place the slices on your dehydrator trays so that they are not touching, stack the trays up, put the lid on and plug ‘er in at about 160 degrees Farenheit. It will be done in about 4- 6 hours, depending on just how dry you want it.

If you don’t have a dehydrator, you can use any kind of “food grade” rack that will allow any drips to drip away from the meat. If you stack the racks, there should be airspace between the tops and bottoms of the racks. You can then dry them in the oven at approximately 160 degrees Farenheit for several hours. If using this method, I suggest a piece of tin foil to cover the oven bottom to catch any drips that drop.

You can also set your racks out in the direct sun for drying. If using the sun method, you will want to cover the meat with a very fine fabric screen, such as the stuff that bride’s veils are made from, to keep the flies away. Flies don’t eat much, but I hear they are unsanitary. They’re also pesky.

For a nice authentic barbeque flavor, you can fire up the grill with a gentle smoking fire of hickory wood or chips and smoke the meat for a couple of hours before you start the dehydrating process.

Test for doneness by tearing a piece at its thickest part and examine the ends where it tore for the absence of pink color, then eat some of it; if it has no pink and you’re satisfied with the chewiness of it, it’s done.

You can store it in zip-lock bags with the air squeezed out, or in vacuum sealed bags, sealed on a machine. If you then freeze the bags, it will keep much longer.

I put mine in snack bags so I can grab a reasonable amount to carry with me.

Jerky is a great food for packing in your get home bag, giving you something to eat if you are delayed in getting home. It’s also a wonderful, nutritious snack to slip into your desk drawer.

Do you have a jerky or other survival food recipe you’d like to share? Perhaps you have a special, tasty marinade that you use or a way to make it faster. We’d all love to hear about it!

If you will click the menu button above, then click resources, you will find my recommendation for a reasonably priced excellent dehydrator.

 When my upcoming, soon-to-be world famous internet radio program (podcast) is up and running, I will go into verbal detail about topics discussed here as well as new topics. It’ll all be revealed a little later, in the podcast. Email me at ozarkmountainbob@yahoo.com to be notified when Your Survival Benefits Program goes live. You are also welcome to email questions or comments to that email address, or use the comments section below.

Your questions and comments that are of a constructive nature and are not demeaning to any person, social or political group are most welcome. After all, if a widespread disaster occurred, we will all become one group: Survivors.

Please share this blog with your friends and family. The information is valuable and will help them too. Also, to be perfectly honest, I need the exposure. I’ll appreciate the help!  If you’ll share, together we can help others and make the world a better place. Thanks!

This author provides this content for educational and informational purposes only. For medical, legal or financial issues, readers should consult with a qualified, licensed professional.
 

I Don’t Like Gardening…But…

Life is full of choices, and even though I don’t particularly like gardening, I do it because that’s what it takes to get the healthy fresh veggies that we like to eat here at our place. There always seems to be a trade-off!

Today I am going to share what I have found to be the easiest method of producing fresh, healthy produce for the table and pantry. This method will empower you to produce very sizeable crops in a small space, once it is up and running.

By no means am I an expert gardener, but I can produce the veggies that my family needs, and I can do it sustainably, and with very little work.

You should know that I have read many, including several really helpful books on the subject and have been gardening on this mountain just shy of fifteen years.

This mountain is very difficult to grow anything other than rocks on. The soil is heavy clay that won’t soak up enough moisture, rocks are everywhere; gardening is difficult here, and if I can do it, you can do it!

Today, I am going to focus on organic/natural gardening because it is by far the easiest, although it is slower to produce results, but it avoids the downward spiral of effectively doping your plants, ruining your soil and making the gardening endeavor more costly and difficult in each succeeding year. Organic gardening is the opposite; it nourishes the soil continuously, making it self-sustaining, so to speak, takes less work and increases in richness each year, and it’s the easiest method I’ve found.

If you want to raise veggies in the fall of 2014 or for the summer of 2015, you need to get started now. For developing a spot for a fall garden this year, you will need to loosen the soil to a depth of 6, maybe 7 inches and break up the dirt clods, unless you opt for raised beds, made by building a simple frame of the size you want (make them narrow enough to enable you to reach past the center of the bed).  For the raised bed, you will need to fill it with soil to plant in. I began my raised beds by scraping 2-3 inches of topsoil from underneath the trees in the woods on my property.

For planting in the ground and getting an immediate crop (this fall) you loosen the ground with a shovel, turning fork and hoe, or use a roto-tiller. The shallower your digging is, the less damage you will do to the soil, which is a living organism, to over-simplify. However, you need to go deep enough to allow root crops (beets, turnips, carrots, etc.) to develop in non-compacted soil. Dig the garden, break up the clumps, smooth it and plant it, that’s the beginning.

Now, we need to feed the plants, starting right away. Feeding can be done with aged manure. Fresh (“green”) manure, may contain too much nitrogen and burn the plants, literally, ruining your crop. Finished compost is the best fertilizer and can be used on top of the ground, as a side dressing, or placed slightly beneath the surface. Problem is, you may not have any finished compost, and you can’t count on the quality of the stuff you buy, for high prices in bags at the garden center.

There is a better way. Dump  a light layer of grass clippings on the surface of the garden, then spread whatever vegetable scraps you have from the kitchen on TOP of the garden. CAUTION: Do not use meat scraps, as they will breed flies, attract animals and if the animals don’t ruin your garden, it will stink a really bad kind of stink.

After introducing the veggie scraps and grass clippings, it is a good time to water. Wet it down thoroughly, then cover the whole thing with a nice layer of mulch, but not the kind from the garden center.

For mulch, the most readily available material is usually leaves, but I don’t prefer leaves because they shed water so well, making it hard for moisture to find its way into the soil, however leaves are better than nothing. Leaves are also better if you can break them up before adding them to the garden, such as with a mulching lawn mower that has a catching bag, or with a chipper/shredder.

Leaves are probably easiest to find, but straw, not hay, is even better. Hay contains seeds and will plant grass in your garden. Stick to straw. You can shred the straw with a lawn mower or shredder to help it breakdown faster, but that is optional. Shredding it will make it work faster. Straw can be purchased from farmers who grow wheat and other grains, and often from feed stores or farm and home type stores.

The very best mulch I’ve found is wood chips. Wood chips can be found by contacting city street departments, electric companies and tree service companies. All of these folks grind the branches they trim off of trees into chips. They grind leaves, branches and all, which provides an excellent mix of nutrients for the garden. Sometimes wood chips are free, and are usually available for a nominal price. I travel to a small city not too far away and get them for $10 for a Bobcat loading bucket that is overflowing. The chips are not very heavy, so unloading with a shovel is not exactly “hard labor.” Once the chips are on the garden to a depth of around 8-10 inches, you will only need to add more every couple of years or so.

The chips let moisture penetrate into the soil and they protect the soil from the sun’s evaporating rays, so moisture is retained. They also limit the growth of weeds to a remarkable degree, if the chip layer is thick, say over four inches. The veggie scraps under the mulch feed the worms, who are plowing the soil, loosening it; the worms are also pooping in it, providing the very best fertilizer that is available, in my opinion. Meanwhile all the micro-organisms in the soil are being fed, and the balance of nature is restored, albeit slowly. Digging upset the natural balance.

After you have established your garden with the steps above, maintenance is quite easy. When you have more veggie scraps saved in the kitchen (We use a 5 quart ice cream container with a lid), go to the garden, and with your rake pull the mulch back in an area and spread the scraps on the top of the soil, then re-cover the area with the mulch you moved. The nutrients that the plants love are leaching into the soil from the veggie scraps, the worms and micro-organisms are being fed and within about 2 years, your garden will be very, very happy.

At the git-go, your plants may look a little weak. If so, or if you do find any bugs attacking your plants, there is an easy solution. Get a clean spray bottle, or pump up sprayer and mix up a concoction of one part milk with four to five parts water, and about 3 tablespoons of unsulphured blackstrap molasses per gallon of mix, mix well and spray on plants and on the mulch on top of your garden. That will give extra nourishment to the plants and kill any bugs that don’t have a pancreas.

In all honesty, you cannot expect a bumper crop from the first planting. Time is required for the soil to be strengthened. If you feel the need, you may want to use an organic fertilizer in the first year.

If you have some weeds, it’s nothing to worry about. Those weeds are pulling nutrients to the surface from deeper in the soil than your veggie roots reach, so they provide nutrients to your plants. For the most part, the weeds use different nutrients than your veggies use. If, and I doubt that it will happen, you get too many weeds, just pull them and leave them on top of the garden to decompose and feed your plants. Everywhere I have used the wood chips, I have only a weed or two, here and there.

You can use any combination of the mulches I’ve mentioned here and get similar results, but I reiterate that I have gotten the best results from wood chips.

Most of the information I have shared here comes from a gentleman named Paul Gautschi, who has produced a stunning video called Back to Eden. You can go to http://www.backtoedenfilm.com and watch the film in its entirety, for free….it’s almost 2 hours and very detailed, educational and helpful. I recommend it highly.

If you don’t want to plant this fall, but want to have a garden next spring and summer, you can skip the digging/tilling step. Just designate your garden spot now, this fall, cover the spot with an optional two or three thicknesses of newspaper, water the paper, scatter your kitchen veggie scraps and cover with 4 – 12 inches of mulch. Keep adding the scraps through the winter, if possible. The winter rains and snows will cause the nutrients to leach into the soil, worms will be attracted in the warmer weather and they will loosen the soil and fertilize it for you. After your last winter frost, you should be ready to plant.

If you buy heirloom seeds, you will have a lower germination rate, at least that has been my experience, but you can collect seeds from each year’s crops and not have to buy seeds again. To overcome lower germination rates, I sprout the seeds between 2 layers of wet paper towels, on a pie plate. When they sprout, I put them in the ground. The garden gets green sooner and I know I planted viable seeds.

A word of caution: When putting your veggie scraps into the garden, DO NOT BURY THEM. If you bury them, they will rob the plants of nitrogen, which the scraps use to decompose. You can avoid that disappointment by spreading the scraps ON TOP of the soil.

Although, we have different preferences at times, Jackie Clay is an expert gardener and writes many, very valuable articles at http://www.backwoodshome.com You will do yourself a favor by checking her out. She gardens in Minnesota.

 When my upcoming, soon-to-be world famous internet radio program (podcast) is up and running, I will go into verbal detail about topics discussed here as well as new topics. It’ll all be revealed a little later, in the podcast. Email me at ozarkmountainbob@yahoo.com to be notified when Your Survival Benefits Program goes live. You are also welcome to email questions or comments to that email address, or use the comments section below.

Your questions and comments that are of a constructive nature and are not demeaning to any person, social or political group are most welcome. After all, if a widespread disaster occurred, we will all become one group: Survivors.

Please share this blog with your friends and family. The information is valuable and will help them too. Also, to be perfectly honest, I need the exposure. I’ll appreciate the help!  If you’ll share, together we can help others and make the world a better place. Thanks!

This author provides this content for educational and informational purposes only. For medical, legal or financial issues, readers should consult with a qualified, licensed professional.
 

Survival Food

It’s me again, neighbor! Ozark Mountain Bob, aka The Voice of Experience, still perched atop my Ozark Mountain. Today I’ve been preparing for winter; cutting up the tree I laid down yesterday, for firewood. Yes, in the 21st century I still heat my home with wood. That’s part of my survival preparations.

While I am aware that you maybe anxious to talk about more exciting things, like knives, hunting, guns, etc., I am presenting this in prioritized order. That’s why we covered water before food. You can live for weeks without food, but only days without water. Also, you can live for a long time without those other things, if you have water and food.

Since I realize that not everyone, in fact few of us can afford to buy everything that every salesperson wants us to buy, we need to approach this subject with economy of effort and money in mind.

As of today, August 21, 2014, money is still the major accepted medium of exchange and most of you are striving really hard to acquire as much of it as possible. Let’s take a step back and get the big picture: Why do you need money? Why do you want money?

The answer most likely is that money buys us the things we want and need. Since constantly rising prices are constantly communicating to us that our money is losing value, I believe in investing my money in the things I want and need, such as survival food, equipment and other supplies, as well as, naturally, the things I need for today. The art and science of survival is to have the things you need if a disaster of some sort makes those things that you need unavailable. When those necessities are unavailable, they will become the medium of exchange, either for a short or long period of time. I would rather trade an item that I have to sell for something you’re willing to trade that will meet my present or projected future needs, rather than to trade it for cash. The end result is the same, and we may both get a better value.

Food will be the second most valuable commodity in hard times. Like water, food is essential to health, wellness and even life itself.

For survival purposes in hard times, it is rather obvious that we should have a good supply of food stored up that will keep for the long haul and provide great nutrition to our families.

What to store up? How much? Where do I store it? How do I manage the supply? Let’s look at some answers:

What to store: Packaged foods can be divided into two major groups for survival: Heavy and light, and both have a place in your stockpile. Generally, light weight food is best if you have to evacuate your home because you can carry more of it, even on foot, if necessary. Heavy foods are great, and expand the variety you can store, if you are able to hunker down at home or don’t mind reducing your gas mileage.

Dehydrated foods are very light to move around, but also require water for re-hydration. Water is heavy. Canned goods are heavy, and most can be eaten cold or hot and don’t need extra water.

Here’s the answer that I rely on for the tradeoff. My Get Home Bag contains 10 store bought, sealed bottles of water as well as 6 packs of Ramen Noodles and several cans of fully cooked meats, beef jerky, Vienna sausage & crackers (carefully placed on top) and an old style military P38 can opener, which probably weighs less than one ounce, can be hung on a key ring and is so simple there’s almost a zero chance of failure. P38’s are usually available at Army/Navy and sporting goods stores. Having a can opener widens my choices of canned goods. I am not limited to “pop tops.” I have enough food in that bag (as well as many other items) to feed myself nicely, not lavishly, for two days, plus. The bag weighs 23 pounds, is a backpack, so I can comfortably carry it all on foot if need be. At 68, 23 pounds on my back is noticeable.

Two types of dehydrated food that are light and don’t need water to re-hydrate are meat jerky and dried fruits and veggies. They are, however, expensive to buy. You can lower the expense by making your own.

That’s a subject we’ll be exploring in the near future. The easiest way for a person to get started is to buy an electric dehydrator and follow the instructions. Mine is a Nesco, rated at 700 watts and will dry up to 12 trays of food quite quickly. I am very happy with it. In the near future, we will talk about simpler, more primitive ways of dehydrating also. Dehydrated foods, especially self-dried, can carry a lot of nutrition in a small, lightweight package. I opt to do it myself because I know what I am eating. That contributes positively to my health/wellbeing.

Dried noodles and soups are light and cheap, but you still have to support them with heavy water.

As for how much to store, getting prepared is going to cost you some combination of time, energy and money. Most of us prefer to have the pantry overflowing and food to fall out of the fridge when we open it, and, of course, the best answer is the more, the better, as long as you can manage to eat it all in rotation before it goes bad. You will have to make the final decision for yourself, balancing your unique needs, finances, time and energy level. Do you have more time or money?

On where to store it, the best answer is anywhere you can, as long as it will be included in your regular eating rotation. I don’t suggest a storage unit in a public storage center because it will be vulnerable, when the unprepared get hungry and looting occurs (2 to 3 days). Ambient temperatures in storage units is usually an issue also. It is best to have it where it is easy to include in your regular rotation and where it’s under your direct control. If your cupboard is small, you can buy or build cabinets/closets, put it under the bed, etc., but keep it out of sight of visitors and don’t broadcast your preparations to anyone you don’t want to have coming to you for food when disaster strikes.

For management, I have already alluded to that several times. Rotate. Store up the foods your family normally eats, with extra, more specialized foods for evacuation scenarios. To make rotation easy, whenever you bring the bacon home, put the new goodies on the shelf behind the older and use from the front. Not difficult and very cost effective.

Last, let’s look at specialized survival food. I think that they are a good thing in their place. Most are freeze dried and touted to last almost forever. Frankly, I don’t want to put my money into something that has such longevity claims and then find out that the company overestimated when I am trying to survive on it several years later. They are also quite expensive, and from what I’ve been told are not very appetizing, but that is the least of your worries in a survival situation.

In the Marine Corps, when I was in my late teens to early 20’s I ate canned C Rations that were older than me by several years. That showed me that canned goods can last a long time, although I don’t expect that kind of shelf life from modern commercial canned goods. I enjoyed the C Rats, as we called them, especially the Ham and Lima Beans.

Then came the modern Meals Ready to Eat, or MRE’s. I found them to be a big step down in taste and enjoyment, but they are effective. They work. Some of the meals are OK, some are downright nasty. MRE’s are mostly dehydrated, so you’ll need more heavy water, unless you opt to eat them dry, which is part of their design. I cannot vouch for how many unpronounceable ingredients they contain. They are also expensive, but still less expensive than the aforementioned commercial specialty foods.

If you are considering this angle for storing food, you can search online and get bombarded with returns, with most making what I consider questionable to unrealistic claims.

If you have had experience with these types of foods, please chime in, in the comments or send me an email to ozarkmountainbob@yahoo.com I would love to hear your take on this. If you sell these foods, and want to prove me wrong, your email is very welcome also. My aim is to provide as much good, actionable information as possible.

When my upcoming, soon-to-be world famous podcast is up and running, I will go into verbal detail about food preservation; how preserve by canning, dehydrating in primitive style and freezing. No, canning is not just for farmers. Apartment dwellers can also increase the nutritional value of their preserved food by canning for themselves. It’ll all be revealed a little later in the podcast. Email me at ozarkmountainbob@yahoo.com to be notified when Your Survival Benefits Program goes live.

Your questions and comments that are of a constructive nature and are not demeaning to any person, social or political group are most welcome. After all, if a widespread disaster occurred, we will all become one group: Survivors.

Please share this blog with your friends and family. The information is valuable and I need the exposure. I’ll appreciate the help!  If you’ll share, together we can help make the world a better place. Thanks!

This author provides this content for educational and informational purposes only. For medical, legal or financial issues, readers should consult with a qualified, licensed professional.